-

Product Configuration
-
Software Installation: Install the dedicated XP8710 software on a Windows PC from the provided CD or website.
-
Connection: Connect the programmer to the PC using a USB cable. Ensure it is recognized by the software.
-
Power On: Switch on the programmer. The internal systems will initialize.
-
Chip Selection: In the software, select the target chip by entering its full part number (e.g., W25Q128JV).
-
Socket Adapter: Choose the correct socket adapter (e.g., DIP8, SOP8) that matches your chip’s package and pin count.
-
Chip Insertion:
-
Orientation is Critical. Align the chip’s notch or dot (marking Pin 1) with the notch or dot on the programmer’s socket.
-
Gently lock the chip into place.
-
-
Basic Operations:
-
Read: First, always READ the chip’s content and SAVE a backup file.
-
Load: Open the new firmware (.bin, .hex file) you want to write.
-
Program: Execute the program command. The software will often Erase, Program, and Verify automatically.
-
-
Standalone Mode: Load files onto a USB drive, plug it into the programmer, and use the touchscreen to select and run operations without a PC.
Quick View
Wishlist
Add to cartProduct Configuration
-
Software Installation: Install the dedicated XP8710 software on a Windows PC from the provided CD or website.
-
Connection: Connect the programmer to the PC using a USB cable. Ensure it is recognized by the software.
-
Power On: Switch on the programmer. The internal systems will initialize.
-
Chip Selection: In the software, select the target chip by entering its full part number (e.g., W25Q128JV).
-
Socket Adapter: Choose the correct socket adapter (e.g., DIP8, SOP8) that matches your chip’s package and pin count.
-
Chip Insertion:
-
Orientation is Critical. Align the chip’s notch or dot (marking Pin 1) with the notch or dot on the programmer’s socket.
-
Gently lock the chip into place.
-
-
Basic Operations:
-
Read: First, always READ the chip’s content and SAVE a backup file.
-
Load: Open the new firmware (.bin, .hex file) you want to write.
-
Program: Execute the program command. The software will often Erase, Program, and Verify automatically.
-
-
Standalone Mode: Load files onto a USB drive, plug it into the programmer, and use the touchscreen to select and run operations without a PC.
-
-
-
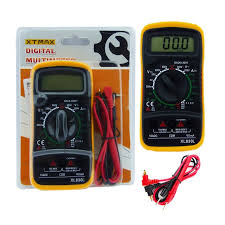
Brand: XT-MAX
-
Model: DT830L
-
Type: Digital Multimeter
-
Functions: DC/AC Voltage, DC Current, Resistance, Continuity, Diode & Transistor Test
-
Display: LCD with backlight
-
Status: Sold Out
-
-

Product Configuration
- Placement: Position the cleaner on your workbench within easy reach of your soldering station.
-
Sponge Preparation: Remove the sponge from the metal cup. Wet it thoroughly with water, then wring it out completely so it is damp but not dripping. Reinsert it into the metal cup.
-
Brass Wool: The container is pre-filled with fine brass wool. No preparation is needed. It is used dry.
-
Usage – Cleaning:
-
Brass Wool: Gently insert the hot soldering tip into the brass wool and rotate slightly. This removes excess solder and light oxidation without cooling the tip.
-
Damp Sponge: Wipe the tip across the damp sponge to remove flux residue and deeper carbon buildup. This slightly cools the tip.
-
-
Maintenance: Regularly empty the metal cup to discard solder balls and debris from the brass wool. Replace the sponge if it becomes burnt or worn out.
Quick View
Wishlist
Add to cartProduct Configuration
- Placement: Position the cleaner on your workbench within easy reach of your soldering station.
-
Sponge Preparation: Remove the sponge from the metal cup. Wet it thoroughly with water, then wring it out completely so it is damp but not dripping. Reinsert it into the metal cup.
-
Brass Wool: The container is pre-filled with fine brass wool. No preparation is needed. It is used dry.
-
Usage – Cleaning:
-
Brass Wool: Gently insert the hot soldering tip into the brass wool and rotate slightly. This removes excess solder and light oxidation without cooling the tip.
-
Damp Sponge: Wipe the tip across the damp sponge to remove flux residue and deeper carbon buildup. This slightly cools the tip.
-
-
Maintenance: Regularly empty the metal cup to discard solder balls and debris from the brass wool. Replace the sponge if it becomes burnt or worn out.
-

-
Model: ZK-PP1K
-
Input Voltage: 3.3V – 30V DC
-
Frequency Range: 1Hz – 150kHz
-
Duty Cycle Adjustment: 0% – 100%
-
Display: LCD screen (frequency, duty, pulse width, delay)
-
Output Signal: PWM (Pulse Width Modulation)
-
Modes: Dual mode operation
-
Applications: Electronics testing, motor control, LED dimming, signal simulation
Quick View
Wishlist
Add to cart-
Model: ZK-PP1K
-
Input Voltage: 3.3V – 30V DC
-
Frequency Range: 1Hz – 150kHz
-
Duty Cycle Adjustment: 0% – 100%
-
Display: LCD screen (frequency, duty, pulse width, delay)
-
Output Signal: PWM (Pulse Width Modulation)
-
Modes: Dual mode operation
-
Applications: Electronics testing, motor control, LED dimming, signal simulation
-


